Showing posts with label cheesemaking. Show all posts

Saturday, January 29, 2011

Homemade Mozzarella Cheese

Yes, I've been delinquent in posting new things. I've been busy with my recent marriage and all that comes with that, and it is hard to keep up with posting new articles.

HOWEVER....I learned something new, and it is really exciting. I learned how to make mozzarella cheese. There is a quick way, and a longer but better way. For now I will tell you about the quick way, since I have not ventured into the longer method.

There are a few things you will need that are usually not easily found in local stores.


One is rennet, this is what forms milk into curds. Another thing is Citric Acid. You can find this sometimes in the canning section of many stores; it is used also in canning tomatoes to keep their color and flavor.


The site that I buy my cheesemaking supplies is http://www.cheesemaking.com/ Ricki Carroll is an old hand at this, and has a good inventory of cheesemaking supplies. None of these ingredients are expensive.

Pour a gallon of whole milk into a large pot, from what I have read skim milk is NOT good for mozzarella. Add 1/2 teaspoon of Calcium Chloride (CaCl) into a quarter to a half cup of water, and mix THOROUGHLY. Then mix the water/CaCl solution into the pot. I was advised to use non-chlorinated water for mixing the ingredients, so I keep a gallon of bottled water handy just for cheese making. You can also let tap water sit for 24 hours to dechlorinate it. I don't really know at this point whether non-chlorinated water is that important or not. Since I am fairly new to this, I do what I am told.

Turn the heat to a low setting. My electric stove goes from 1 to 9 and I warm the milk at about 2 to 2.2. I could probably go higher but I'm a rookie and I'm scared!.


When the milk reaches 55 degrees F, add 1.5 teaspoons of Citric Acid, again mixing it into a quarter cup or so of water before adding to the milk. Stir it gently but well, and continue slowly heating.

It will start to look like Ricotta cheese.


When the milk reaches 88 degrees F, it's time to add 1/4 teaspoon of liquid rennet. Again, it is mixed with 1/4 cup water before adding.


Stir the milk with an up and down motion for one minute after adding the rennet. Continue heating the milk until it reaches 100 to 105 degrees. After adding the rennet you want to avoid bumping or moving the pot. Disturbing the pot can prevent a good curd from forming.


Turn off the heat but let it sit for about 20 minutes. The curd should start to separate from the side of the pot.


Using a large spoon (I found my pasta spoon worked wll) scoop out the curd from the pot and place into a large microwaveable bowl. I've heard the leftover whey (the liquid remaining) is great feed for chickens, hogs, etc, but I don't have any critters like that.

Press the curd down with your hand to remove excess liquid. Now place the bowl in your microwave oven on high for one minute. My microwave is fairly strong so you might want to add a little time to yours, depending on your microwave.


Since the cheese gets fairly hot, I put heavy duty kitchen gloves on at this point, and press the cheese with my hand to drain even more liquid from it. Wash your gloves before using, just like you do with your hands!


Drain off all of the excess whey that you can. Fold the cheese over and over in your hand to distribute the heat throughout the cheese.

Microwave 2 more times for 35 seconds each time. Each time you heat it knead the cheese again to distribute the heat. Knead it quickly until it is smooth and elastic like taffy.


When it feels like taffy, it is done! If the cheese breaks instead of stretching the cheese is too cold and needs reheated.

Mozzarella is best eaten fresh; roll it into small balls for fresh eating. However, it's not always practical to eat it right away. If you are making it for eating at a later time, you can form it into a loaf, a ball, or once I made 3 ropes out of the cheese and braided it (it looks really cool that way.) Then you want to place the cheese into a bowl of ice water for about a half hour to cool it rapidly. Now you can store it covered in the refrigerator.

Here's a idea I came up with, and it REALLY tastes good. When the finished cheese is still warm, shiny, smooth and like taffy, roll it out onto your counter with a rolling pin. Roll it into a rectangular shape about 12-16 inches long and 8-10 inches wide.


Now place just about anything you would like on it. In this batch I used fresh basil that I broke up into small pieces, and chopped black olives. A good prosciutto would be nice, I am going to try that sometime.


Now roll it up like a jelly roll


Place the cheese in plastic, wax paper or in a closed container until it cools and stiffens somewhat. Then slice across the roll to make small slices about a half inch thick, and eat.


Tonight I went to a dinner party where I made bruschetta and it turned out GREAT! I used this recipe for the bread. I cut the bread into about 1/2 inch slices. Then I made a batch of mozzarella and formed it into a loaf/roll about 2 inches in diameter.

When the cheese cooled I cut slices that were about 1/4 inch thick. I baked the plain bread for just a few minutes in a 350 degree oven (not broiler) to make it more crisp, then placed 2 slices of the mozzarella on each slice of the bread. I topped all that with a mixture of finely chopped tomatoes, smashed and chopped garlic, chopped fresh basil, grated Parmesan cheese and a quick splash of olive oil and balsamic vinegar. I then baked it for a couple more minutes until the cheese was starting to melt and the edges of the bread just started to brown a little bit. Be sure to watch the bruschetta in the oven closely while it is baking. It doesn't take long and it would be easy to set off smoke detectors instead of eating a good bruschetta.

It was SO good, it disappeared quickly! I will have to make another batch for us to eat at home.

Mmmm....lotsa mozza!

Wednesday, April 22, 2009

Chipotle Cheddar

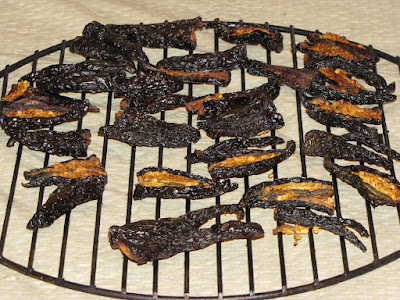
Back in the beginning of March I got the idea to make some chipotle peppers. Chipotles are smoked jalapenos, if I remember correctly they are red jalapenos. Since I was limited to store-bought jalas I had to settle on green ones. I started a low-heat smoke and smoked them for about maybe 8 hours, but I think it was longer. The idea is to smoke them, dry them, but not cook them.


From Cooking, Canning, Gardening


After smoking the peppers I placed them in the oven to dry them completely. I dry herbs and other things in this same manner. Place your oven at the lowest temperature it will go, generally this is 150-170 F, and leave the door of the oven cracked. I sometimes turn the oven off from time to time, just so that it doesn't get too warm. Again, I want to dry them, not cook them.

After they are dried, they can be put into oil, or an adobo sauce, or ground. I ground mine in my coffee grinder. If you do this, be *SURE* to wash out the grinder completely before using it for coffee. Otherwise the resulting coffee will REALLY wake you up.

I wont go into all of the cheese making steps, that will have to come in another post. But what I did was to make a cheese but not age it. It doesn't have some of the flavor that an aged cheese will have, but it is done in 24 hours. I do this occasionally when I need a 'quick fix', and it turns out well.

First I boiled 1.5 TB of the chipotle powder in about 1/4 cup of water for 10 mins. You have to watch this closely so that it doesn't boil dry. Add a bit of hot water if it starts drying too much in the pan.

I used two gallons of milk (store-bought) 1/2 tsp of Calcium Chloride, homemade cheese culture** and 1/2 tsp of rennet to set the curds at 90 degrees. Before adding the rennet to curdle the milk, I stirred in the chipotle powder in water.

After the curds set, the curds were cut into 1/2 inch cubes, then the temp was raised to 100 degrees over about 30 mins. The curds were then poured into a piece of cheesecloth (muslin, not the standard 'cheesecloth' that you see in stores) and drained for over an hour hanging over a bowl.

After draining, the curds are broken up and placed in a bowl and 1 TB of canning salt mixed in thoroughly. Then it was placed into a mold and that placed on my newly-built cheese press.

From Cheese Making


It's a graduated process to press the cheese. First it is pressed at a 10 lbs of pressure for 10 minutes, then the cheese is flipped over in the mold, pressed again for 10 minutes. Then it is flipped again and pressed at 40 lbs of pressure for 12 hours. Since most recipes are written for 4 inch molds, and the homemade molds that I used this time are 8 inches in diameter, I had to double the weight.

Then I let it air-dry for a few hours to get a bit of a rind on it, and I was done. It really has great flavor and a bit of kick to it also.

From Cheese Making


From Cheese Making

** I doubt that the culture was necessary since this is not an aged cheese, I think I did it out of habit more than anything. However, I make my own mesophilic culture and that is very easy. Take a pint of buttermilk and let it sit at room temperature overnight. Pour it into ice cube trays and when it is frozen, break out the cubes and place them in a freezer bags and place in freezer. They will keep for a month this way.
Also, I noticed after posting this that the cheese looks a lot more lumpy/crumbly in the photographs than it really is in real life.

Tuesday, March 3, 2009

Failures

I think it's important to relate your failures as well as your successes. In a past post I talked about starting red-wine vinegar. I had read where it can sometimes 'go bad', and if it starts to smell like furniture polish, to throw it away and start again. That's exactly what happened. YUK! What an awful smell. However, I have known people that have successfully made it so I am going to just try again. More on this later.
Cheese making, for the most part, has been a success. I've made some Farmhouse Cheddar and Gouda that tasted just fine. A couple of the first batches that I made were a bit bitter and I threw them away. But I have been eating some that tasted very good. With some things going on at home, including drywall/priming/painting and building a cheese press among other things, I haven't been posting a lot. However, I started another batch of gouda tonight, and want to start another batch of cheddar.
Hang in there, garden season is coming and I will have a lot to report. Though the Ohio ground is still frozen, I hope to be planting some early crops soon. My target date for the first salad from the garden is the first week of May.

Sunday, January 4, 2009

Cheese Head

I got interested in cheese making recently, and of course, had to try it. This looks like this will be fun. I started my first hard cheese Friday night, a Farmhouse Cheddar. My instructor is Ricki Carroll and her book 'Home Cheese Making'. No stinkin' wonder cheese is so expensive; it takes a LOT of milk and forever to let it age. This cheese should age for a minimum of 60 to 90 days, but I know I am going to cheat and at least try it at 30 days.

I started a batch Friday, Saturday and today (in between church services) and they are air drying on my counter for 2-4 days to develop a rind. Then I will be coating them in wax and letting them age. I am thinking that if I start one batch per week that will keep me in cheese heaven. The problem is, it will take me 60-90 days to see if I totally botched them up and destroyed them. Early cheese makers probably went through the same trials.

I wish I could take more photos of the process, because if you know me personally I take pictures of everything. However, after 11,000 pictures my digital camera (Minolta Dimage 5) the shutter button on my camera is stuck, and I'm not sure what I can do about it.

So recently I have cured my own ham from a 3 lb. pork loin and smoked it, started cheese, made some buttermilk, sour cream, butter, made 5 lbs of breakfast sausage, and started 5 liters of red-wine vinegar. Not bad for a wanna-be do-it-yourselfer!

More to come on the upcoming cheese, and hopefully pictures too. Soon to come - homemade bratwurst.

Marty

PS: check out the pictures of Cowgirl's smoked prime rib on her blog (http://cowgirlscountry.blogspot.com/) Oh my goodness gracious, I have to do this now!