 |
| From Cooking, Canning, Gardening |
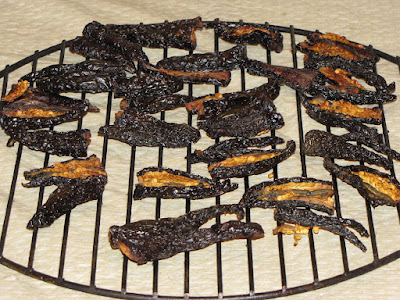
After smoking the peppers I placed them in the oven to dry them completely. I dry herbs and other things in this same manner. Place your oven at the lowest temperature it will go, generally this is 150-170 F, and leave the door of the oven cracked. I sometimes turn the oven off from time to time, just so that it doesn't get too warm. Again, I want to dry them, not cook them.
After they are dried, they can be put into oil, or an adobo sauce, or ground. I ground mine in my coffee grinder. If you do this, be *SURE* to wash out the grinder completely before using it for coffee. Otherwise the resulting coffee will REALLY wake you up.
I wont go into all of the cheese making steps, that will have to come in another post. But what I did was to make a cheese but not age it. It doesn't have some of the flavor that an aged cheese will have, but it is done in 24 hours. I do this occasionally when I need a 'quick fix', and it turns out well.
First I boiled 1.5 TB of the chipotle powder in about 1/4 cup of water for 10 mins. You have to watch this closely so that it doesn't boil dry. Add a bit of hot water if it starts drying too much in the pan.
I used two gallons of milk (store-bought) 1/2 tsp of Calcium Chloride, homemade cheese culture** and 1/2 tsp of rennet to set the curds at 90 degrees. Before adding the rennet to curdle the milk, I stirred in the chipotle powder in water.
After the curds set, the curds were cut into 1/2 inch cubes, then the temp was raised to 100 degrees over about 30 mins. The curds were then poured into a piece of cheesecloth (muslin, not the standard 'cheesecloth' that you see in stores) and drained for over an hour hanging over a bowl.
After draining, the curds are broken up and placed in a bowl and 1 TB of canning salt mixed in thoroughly. Then it was placed into a mold and that placed on my newly-built cheese press.
 |
| From Cheese Making |
It's a graduated process to press the cheese. First it is pressed at a 10 lbs of pressure for 10 minutes, then the cheese is flipped over in the mold, pressed again for 10 minutes. Then it is flipped again and pressed at 40 lbs of pressure for 12 hours. Since most recipes are written for 4 inch molds, and the homemade molds that I used this time are 8 inches in diameter, I had to double the weight.
Then I let it air-dry for a few hours to get a bit of a rind on it, and I was done. It really has great flavor and a bit of kick to it also.
 |
| From Cheese Making |
 |
| From Cheese Making |
** I doubt that the culture was necessary since this is not an aged cheese, I think I did it out of habit more than anything. However, I make my own mesophilic culture and that is very easy. Take a pint of buttermilk and let it sit at room temperature overnight. Pour it into ice cube trays and when it is frozen, break out the cubes and place them in a freezer bags and place in freezer. They will keep for a month this way.
Also, I noticed after posting this that the cheese looks a lot more lumpy/crumbly in the photographs than it really is in real life.
No comments:
Post a Comment