Friday, May 29, 2009

Smarter Not Harder

Yes, I've been delinquent in not posting anything lately. There's been a lot that I could have posted, but that's the problem; I've been doing a lot!
I did want to share a huge time-saving idea, using plastic weedblock/landscape plastic on the garden. This saves so much time with weeding, and keeps moisture in the ground so well. Even in the heat of the summer, you can pull a little of the plastic back and the soil will be at least a little damp.
I buy the cheapest rolls of landscape plastic I can buy because it will only be used for one season.
From Cooking, Canning, Gardening


Then roll it across the ground where I want to plant:
From Cooking, Canning, Gardening


Next cut about a 6 inch cross where I want to plant:
From Cooking, Canning, Gardening


Then loosen up the soil in the hole:
From Cooking, Canning, Gardening


Next place the plant in the hole, firm down the soil, and water well:
From Cooking, Canning, Gardening


From Cooking, Canning, Gardening


I've been doing it this way for a few years now and can not imagine going back to all that weeding. And the plants do very well without all that water evaporating.

Thursday, April 23, 2009

Early Garden Progress

We are getting closer to the time when we can plant warm-weather crops here in central Ohio, but we aren't there yet. I was at a local nursery today and wondered how many of the people buying tomato plants were going to be planting them today or very soon. It's always a disaster when they try, more cold is coming sometime between now and the 2nd week of May.

However, I am going to experiment with some early tomatoes, using my Wall-O-Water plastic protectors. I started last year at the beginning of May using them, and they worked great. Now I want to push it up a week and try planting here now during the 4th week of May. I have heard people starting a lot earlier than this using the WOW's but I want to ease my way into it, and experiment with 4 Better Boy plants. I should be planting those tomorrow, and will report on their progress.

As I said in a previous post, I planted some early crops as early as March 10th. I also posted a picture of the spot, though it was bare. So here is the same spot as of yesterday, April 23rd:

From 2009 Garden

Left to right are spinach (Bloomsdale) looseleaf lettuce (Salad Bowl), bibb and romaine lettuce, and radishes. The romaine is from seeds I kept from last year, something I want to do more with other vegetables.


And nearby here are the peas (Sugar Snaps):

From 2009 Garden


So things are growing, thriving so far in the garden. The target date that I set months ago for that first salad is May 1, that might be a bit overambitious. However, the weather forecast shows that it is going to be quite warm between now and then, so we will see.

Wednesday, April 22, 2009

Growing Portabella Mushrooms

I've noticed mushroom growing kits in catalogues and online for a few years now. 'The Gurlyfriend' Sue bought me one for my birthday, a portabella mushroom kit, that she got through Harris Seeds, http://www.harrisseeds.com/ It took several weeks for it to arrive, but Harris farms these out to another company.

It comes in a box, apparently it is sterilized manure, and with a bag of inoculated medium.

From Cooking, Canning, Gardening


The first step was to open the box, and arrange the medium on top of the soil in the box. Then it was kept in a dark area for a week. After a week, you form a tent with an enclosed bag that has holes for air in it. You wait for at least a week, misting/spraying it every other day with water. Then little pinheads of portas start to appear.

From Cooking, Canning, Gardening


These go quickly, about 4-5 days or so, from pinheads to large mushrooms.

From Cooking, Canning, Gardening


They really tasted good sauteed and on top of a NY strip

From Cooking, Canning, Gardening


From Cooking, Canning, Gardening


Time will tell if this is worth the money or not, but either way it is a lot of fun.

From Cooking, Canning, Gardening

Chipotle Cheddar

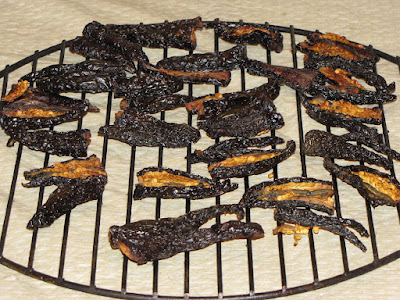
Back in the beginning of March I got the idea to make some chipotle peppers. Chipotles are smoked jalapenos, if I remember correctly they are red jalapenos. Since I was limited to store-bought jalas I had to settle on green ones. I started a low-heat smoke and smoked them for about maybe 8 hours, but I think it was longer. The idea is to smoke them, dry them, but not cook them.


From Cooking, Canning, Gardening


After smoking the peppers I placed them in the oven to dry them completely. I dry herbs and other things in this same manner. Place your oven at the lowest temperature it will go, generally this is 150-170 F, and leave the door of the oven cracked. I sometimes turn the oven off from time to time, just so that it doesn't get too warm. Again, I want to dry them, not cook them.

After they are dried, they can be put into oil, or an adobo sauce, or ground. I ground mine in my coffee grinder. If you do this, be *SURE* to wash out the grinder completely before using it for coffee. Otherwise the resulting coffee will REALLY wake you up.

I wont go into all of the cheese making steps, that will have to come in another post. But what I did was to make a cheese but not age it. It doesn't have some of the flavor that an aged cheese will have, but it is done in 24 hours. I do this occasionally when I need a 'quick fix', and it turns out well.

First I boiled 1.5 TB of the chipotle powder in about 1/4 cup of water for 10 mins. You have to watch this closely so that it doesn't boil dry. Add a bit of hot water if it starts drying too much in the pan.

I used two gallons of milk (store-bought) 1/2 tsp of Calcium Chloride, homemade cheese culture** and 1/2 tsp of rennet to set the curds at 90 degrees. Before adding the rennet to curdle the milk, I stirred in the chipotle powder in water.

After the curds set, the curds were cut into 1/2 inch cubes, then the temp was raised to 100 degrees over about 30 mins. The curds were then poured into a piece of cheesecloth (muslin, not the standard 'cheesecloth' that you see in stores) and drained for over an hour hanging over a bowl.

After draining, the curds are broken up and placed in a bowl and 1 TB of canning salt mixed in thoroughly. Then it was placed into a mold and that placed on my newly-built cheese press.

From Cheese Making


It's a graduated process to press the cheese. First it is pressed at a 10 lbs of pressure for 10 minutes, then the cheese is flipped over in the mold, pressed again for 10 minutes. Then it is flipped again and pressed at 40 lbs of pressure for 12 hours. Since most recipes are written for 4 inch molds, and the homemade molds that I used this time are 8 inches in diameter, I had to double the weight.

Then I let it air-dry for a few hours to get a bit of a rind on it, and I was done. It really has great flavor and a bit of kick to it also.

From Cheese Making


From Cheese Making

** I doubt that the culture was necessary since this is not an aged cheese, I think I did it out of habit more than anything. However, I make my own mesophilic culture and that is very easy. Take a pint of buttermilk and let it sit at room temperature overnight. Pour it into ice cube trays and when it is frozen, break out the cubes and place them in a freezer bags and place in freezer. They will keep for a month this way.
Also, I noticed after posting this that the cheese looks a lot more lumpy/crumbly in the photographs than it really is in real life.

Friday, March 27, 2009

New Babies

The early crops are already popping up, and they were planted less than 2 weeks ago. I read on the back of the seeds packages and for the early crops it says "Plant in early spring as soon as ground can be worked'. I figure that if I can scratch a line in the muddy and/or frozen ground to place a line of seeds, then that is the ground being worked. And every year I hear at least a few people saying that 'it's too early, you can't grow anything yet'. Those are the people that I like to take a bowl of salad to in the first week of May. That's about the time they are thinking about what seeds they should buy.

On March
14th I planted my first early crops and by March 24th I had 3 types of lettuce, spinach, peas and radishes visibly growing above the ground. Also, I have my rhubarb and the garlic that I planted last fall coming up. If the weather doesn't take a turn for the worse, then I might be eating salad by the end of April, and just might set a personal record for the earliest salad. My personal best so far was last year, I had my first salad on May 5th.


Here's some new-baby pics:

Asparagus
From 2009 Garden


Sugar Snap peas
From 2009 Garden


One of my 3 varieties of lettuce
From 2009 Garden


Spinach (my favorite!)
From 2009 Garden


Rhubarb
From 2009 Garden


Garlic
From 2009 Garden


Yes, it's early, but many veggies THRIVE when it's early and either are stunted or bolt when it gets hot.

Thursday, March 26, 2009

Smoked Meatloaf

I've read where people have smoked their meatloaf and I had to try it. I used a simple meatloaf recipe to try this, use any meatloaf recipe that you would like to use. Here is what I used though:

2 lbs ground beef


1 medium onion, chopped fine

1/2 green pepper, chopped fine

3 cloves garlic, minced

1 cup bread crumbs

2 eggs, beaten

1 cup catsup

1/4 cup milk

Mix all of these together in a bowl.

From Cooking, Canning, Gardening


On a couple of layers of heavy-duty foil, form into a loaf.

From Cooking, Canning, Gardening


Then, on to the smoker for about 4 hours.

From Cooking, Canning, Gardening


Here's what it looks like after smoking:

From Cooking, Canning, Gardening


And, just like momma used to do, covered in a catsup and brown sugar mix:

From Cooking, Canning, Gardening


Simple, easy, and oh-so-good! It tasted great.

Smoked Italian Sausage

I made one goof/oops when making this, thus it turned out just 'ok'. I will explain later. However, it was a lot of fun to make and I learned a lot. This can be used simply as bulk sausage, but I wanted to play with my new toys, and stuff it in casings.

Ingredients;

5 lbs ground pork shoulder or butt

2 T salt

3 tsp fennel seed

2 T sugar

1 T crushed hot peppers (made from my garden peppers, of course!) Skip this or cut it down if you don't like hot Italian Sausage.

1 tsp caraway seed

3 tsp coriander

about 5 cloves of crushed garlic

1/2 cup of cold water


Grind the meat with coarse grinding plate (or buy it pre-ground.) Grind the salt, fennel, sugar, pepper, caraway and coriander together. Mix spice mixture into meat, along with garlic and water. 'Git yer hands in there and git'r done well.'

At this point you have Italian Sausage and you could bag it, or vacuum pack and freeze. However, this is where I got my sausage stuffer out. My stuffer is actually a meat grinder with a sausage-stuffing funnel/tube on the end.

From Blogger Pictures


First, I soaked the casings ('casings' is the nice way of saying pig intestines) in cold water for a half hour. Then I ran water through the casings to rinse out the excess salt, which they are packed in. Then you coat the stuffing tube with vegetable shortening, and slide the casing over the tube. Then tie a knot in the exposed end.

I stuffed the casings snugly but not excessively, for I need to pinch links off after stuffing the casing. First I stuffed the entire 5 lbs into one long roll, with no individual links.
From Cooking, Canning, Gardening


I make links by pinching the roll every 6-8 inches and rolling every other link in the same direction.
From Cooking, Canning, Gardening


Then I placed the sausage on the smoker, with low heat and a good amount of smoke.

From Cooking, Canning, Gardening


I was hoping to do this for about 4 hours, but this is where I goofed. I evidently put too much, and too dry, wood on at one point, and the wood caught fire. This caused much more heat than I wanted, but I didnt find out until it was too late. No, they weren't burned but they had dried way too much. I didn't add extra fat, so they were going to be much leaner than store-bough sausage anyway, but this overheating dried it more than I would have liked.

It still tastes good, it's just not the juicy (fatty) sausage that you would buy in a store.

From Cooking, Canning, Gardening


I cooked up several links in a spaghetti sauce, served over penne pasta, and it was really good regardless.

Next time, MAYBE I will add some extra fat, but definitely will mind the smoker a bit more closely!

Tuesday, March 17, 2009

Mighty neighborly of ya

My neighbor was out tilling his garden with his tractor today. I stood by and watched with a bit of jealousy, because he was getting his tilled in 10 minutes instead of my 4 or 5 hours. I got a knock on the door later and he asked if I wanted mine done. "Well, I dunno, maybe, I guess, SURE!!!"
Here's Bill in action, with his tractor pulling a tiller with a 4 ft wide swath:
From 2009 Garden

From 2009 Garden

Next thing you know, 'I' am all done with my tilling:


From 2009 Garden

Not bad eh? Mighty neighborly of him, wasn't it?

Monday, March 16, 2009

Starting the garden

It's that time of year, time to get the garden started. I had a lot of winter 'junk' in the garden in the form of leaves, sticks and such that I had to clear and burn. I would have mulched it up with my mower but I need to buy a new mower, the old one has finally gone belly-up. Here's a pic of the slash-and-burning I was doing. I hope to get pictures every few weeks or so from this same place, as the gardening progresses.

From 2009 Garden

This past Saturday I planted 4 things; Salad Bowl lettuce (looseleaf), Bibb lettuce, Romaine Lettuce, Sugar Snap peas, and spinach (good ol' trustworthy Bloomsdale). I plant early by not worrying about tilling a specific area of the garden, an area saved for early crops. These crops won't last until mid-summer anyway, so I can till and plant more in this area later in the year (if I get time!)

OK, this next pic doesn't look like much, but this same are will look better in about a month. This is where I planted my first crops:

From 2009 Garden


I also pruned my grapevines, my sour cherry tree and one of my apple trees. I'm thinking about cutting 2 of my 3 apple trees down, they don't produce a good apple. I don't know the variety (Jonathon??) since they were here when I moved here. I have one apple tree that produces a nice apple for making applesauce and fried apples. It is probably a Granny Smith, but I dont know for sure.

On my ever-growing To-Do list is to soon plant some onions, scallions, more peas and anything else I can get in, weather permitting.

I'm making calzones tonight, look for another post on that!

Wednesday, March 11, 2009

Homemade Pastrami


My goal in life lately has been to get to the point where Cowgirl(http://cowgirlscountry.blogspot.com/) will be jealous of my food, rather than vice-versa. She is definitely the one I admire the most of any of the cooking bloggers I have seen, hands-down.
-
After making a number of batches of corned beef, I wanted to take it one step further and make pastrami. This is another project where plannning comes into play, for the brining of the meat takes 2-3 weeks.

I would have used a beef brisket, but have found some lesser-quality (cheaper!) cuts do fairly well too. I bought a very cheap 2.5 lb beef round roast at about $1.50 lb, since I have NO qualms about buying the roasts that are marked down in their last day in the grocery store.)
Next you brine and spice the roast in a freezer bag in the fridge for a couple weeks. For this, see my post "Corned Beef" dated 10/22/2008.
After that has brined for 2 or 3 weeks, I put it in a bowl of cold water to remove some of the salt for 30-60 minutes.

Then I added a generous amount of rub. The recipe I followed, for this 'small' 2.5 lb roast, was:
2.5 T kosher or canning salt
2 T paprika (cowgirl would've had the paprika already smoked!
1.5 T coriander seeds
1.5 T brown sugar
1 T black peppercorns
1 T yellow mustard seeds
1/2 T white peppercorns
8 cloves garlic, minced
Grind all this together in your spice or coffee grinder, then rub this all over the meat, being very generous with the amount you use. I've read articles that state that rubs aren't really rubbed in, its just called a rub. Meadow-muffins, rub that stuff into the meat.

My goal was to smoke this for about 4-5 hours, but after 2 hours the wind REALLY kicked up. This really robs the heat from my bullet-smoker, and I had to improvise. I read some articles online about making pastrami in the kitchen oven, and had to employ this after the meat was smoked for 2 hours.
With the wind ruining my plans, I wrapped it up twice in heavy-duty aluminum foil and placed it in a 225 oven. I baked it this way for 3.5 more hours. After it cooled somewhat I placed it in the fridge overnight.
The next morning, I was astounded at how good this looked. I took a thinly-sliced pieces and steamed them for about 30 minutes (many restaurants steam them for 4-5 hours) and tasted it.
It wasnt the most lean, tender meat in the world but you didn't notice because the flavor was out of this world. Sometime I will try a better cut of meat. Shoot, this was so good I am barely motivated to pay 200% more money to get something 10% better in quality than this.
Heck, I was impressed. Maybe even the cowgurl is impressed. I know my gurlyfriend Sue will be, but she's like that!