Sunday, April 22, 2012

Solar Canning Jar Lights


Here is a picture of this solar-powered canning jar light that I made last night. I can foresee many variations on this using blue jars, clear jars, with and without frosted glass, etc. Hopefully soon I can post some directions on how to make these.

Friday, March 30, 2012

White Grape Jelly With Hibiscus Flower


I am so happy with the way this turned out! I bought some edible hibiscus flowers that were canned in syrup online, and basically followed the directions for my layered jelly.

The difference was that both layers were made with white grape juice, but you could make one of the layers purple if you preferred. Also, when pouring the first layer, I added a hibiscus flower to the jar. The reason there are two layers is because the flowers float in the jelly and I didn't want the flower at the top. I'm now trying to figure out if there is a way to stick the flower to the bottom of the jar and then filling with jelly. So far, I can't think of any way.

I rinsed the flower well because it is packed in what looks like beet juice and I didn't want the jelly to get cloudy. After the first layer sets, just add the second layer and process/seal.

Here is what it looks like after the first layer is done.


This is actually fairly simple, it just takes two batches of jelly. However, your yield is twice normal so 'it all comes out in the wash.'


There are a LOT of possibilities with layering jelly and jams, I think I have just scratched the surface. I THINK this is a unique idea, because I am unable to find anyone else doing it on the web. Anyway, I am pretty happy with it!

Wednesday, March 14, 2012

Marty's Layered Purple & White Grape Jelly


There is a big women's event coming up at our church in April, the 10th Annual Ladies Gala.

They allow certain vendors to sell items, and I signed up to sell jellies and jams. I have been thinking of ideas for jellies and jams that are different, unique and/or have eye-appeal. This past week I came up with the idea for layered jelly. Just to see if there was actually someone else that had done it before, I surfed the net and found nothing. Someone somewhere has probably done this before, but I didn't see any web postings.

This ended up being fairly simple. Each of the layers have the same ingredients (except for the color of the grape juice.) Also, I worked with grape juice instead of grapes and that is a HUGE time saver.

I am going to make an assumption here that anyone trying to do this has at least SOME experience in jelly/jam making. It will save me the time of typing out each and every little instruction! My yield for this was 10 half-pint jars.

Ingredients for each layer:
3 cups of grape juice (4 cups for the white jelly and 4 cups for the purple jelly)
4 cups of sugar
1 packet of pectin powder
1/2 teaspoon of butter (optional, reduces foaming)
Also get a clean, sterilized cloth ready by boiling it in water, I will talk about why you do that later.

Add the 4 cups of juice of the color you want on the bottom of the jar, the pectin and butter to a large pot. You will get splattered with very hot drops of jelly if you use a small pot! Stirring constantly on high heat, bring the juice up to a very hard boil. Then add all of the sugar at once, keeping the heat on high, and constantly stirring.

Bring again to a FULL ROLLING BOIL, a boil that does not go away when stirred. Most jelly recipes will tell you to boil for exactly one minute at this point. I needed to insure that this jelly set right, and set firmly. You need to get it to the point where the jelly sheets, or at least drips a lot slower than normal from the spatula or spoon. So at the one-minute mark I started dripping juice from the spatula, until the drips slowed down quite a bit and started elongating before they fell off the spatula. This ended up being two minutes of the second boil.

Next quickly pour the jelly into the jars and bring it up to the HALFWAY mark only. You will NOT place the lids and rings on the jars yet, you need to make another layer.

Some of the jelly has probably run down the sides of the inside of the jars. You want to remove this as well as possible, so there there will be a clean, distinct line between the layers in the jars.
Use a corner of the sterilized cloth that you prepared to wipe any of this jelly from the sides of the jar.

Cover the jars with small pieces of plastic wrap, this will prevent 'the ickies' from getting in the jars while they set.


Wait until the jelly has set firmly before starting the next layer. After an hour I checked mine and they were fairly firm. It might be longer or shorter for you, depending on that batch of jam.

Now remove the plastic wrap and prepare a second batch of jelly, using the other color of grape juice. At this point you want to heat your lids too, since you will be sealing them after this layer.

When all of the jars are filled with the second layer, leaving 1/4 inch of headspace, place the lids and rings on the jars. Finally, process in a boiling water-bath canner for 10 minutes.

These look really nice, I hope they sell well. My next batch is going to take the visual-appeal one step further. The next batch will be a layer of apple jelly but with a maraschino cherry or two added, with a layer of white-grape jelly also with a maraschino cherry or two. At least it sounds good in my head, we will see when I do it in the next few days.

Just to show that the jelly really did set, and the colors didn't just settle, here is a jar turned on its side.

Wednesday, February 1, 2012

Pasta and Hot Dogs


I'm posting this because it is was fun, funny and unique!  My Facebook friend Lezlie showed me this and I just HAD to try it.  Someone in my Canning group on Facebook must have already known about this and has a name for it, "Octo-Dogs" which I thought was pretty darned funny.
This is so simple that my friends the Jamisons can do it(I think.)  Cut up some hot dogs to about 1 inch to 1.5 inches long.  Then stick 7 or 8 dried spaghetti noodles through them.  You can stick them halfway through or just barely through them, whatever strikes your fancy.


Cook them in boiling water until the pasta is done, about 12 minutes.  Hey, this is kid food (and Marty food) so it really doesn't matter that the hot dogs are over-done!  Then drain them in a colander and you should get something that looks like this:


Now simply pour some spaghetti sauce over them and you have a fun and funny kids' meal:


Now, how easy is that for a fun meal?

Next, I want to try my Italian friend Ron's idea of doing this with Italian Sausage!

Coming up, I cure and smoke a whole ham after buying a half-pig.

~ Marty


Thursday, January 5, 2012

Braided Onion Bread


Now ain't that purty...?

It is also easy to make. I think I got this from another website, and if I knew for sure if I did or not I would give that person the credit.

Ingredients

Bread
2 1/2 tsp (.25 oz) active dry yeast
1/4 cup sugar
3/4 cup water, warm (100-110F)
1/2 cup milk
3 tbsp vegetable oil
1 large egg
1 1/2 tsp salt
4 – 4 1/2 cups flour

Filling
2 tbsp butter
2 large cloves garlic, minced
1 cup diced sweet onion (such as Vidalia or Hawaiian)
1/4 tsp salt

Combine the yeast, sugar, and warm water. Let stand for 10 minutes or so until it starts to get foamy.

Stir in milk, vegetable oil, egg, salt and 2 cups of flour, mixing just until all the ingredients come together into a thick batter.

I used my KitchenAid, and using my dough-hook I mixed the dough on medium-low speed and gradually added the other 2 cups of flour. You may not have to add the last 1/2 cup of flour. The dough should pull away from the sides of the stand mixer when it is done. It should be soft, but not sticky.

Place the dough into a lightly greased bowl, cover with plastic wrap or like I do with a slightly damp towel. Let this rise in a warm, not hot, place for 60-90 minutes until it has doubled in size.

While dough rises, prepare the filling. Melt the butter in a small saucepan over medium-high heat. Add in minced garlic and saute for a few minutes, until garlic is fragrant. Remove from heat and pour butter and garlic into a small bowl. Add in diced onions and salt. Toss all of this to combine it. Set it aside and allow to cool.

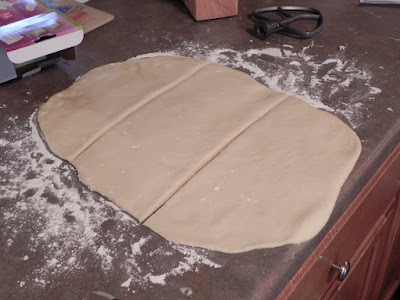
When dough has risen, turn dough out onto a lightly floured surface. Gently deflate dough and press it down into a rectangle that is about 8 by 12 inches. Divide dough into three even pieces about 8 by 4 inches. Here is where differed from the recipe I had. I rolled out the 3 sections much larger than 8 by 4, probably more like 16 by 8. This made the bread easier to braid and made a longer loaf.


Carefully spread 1/3 of the onion mixture into the center (lengthwise) of one of the strips of dough. Pull in the sides to enclose the filling.


Pinch dough very firmly along the seam and at the ends to seal. Repeat with remaining dough strips.


Transfer dough strips to a parchment-lined baking sheet.
Braid three filled strips of dough together and pinch together the ends to finish the loaf.


Cover with a clean dish towel and allow bread to rise for 45 minutes.

Preheat oven to 375F. Bake for 35-40 minutes, until bread is a dark golden brown.

Allow bread to cool completely before slicing. Take a loaf over to a friend and give it away and impress the heck out of them!